With AI Actions, your AI Agent can go beyond just chatting - it can now do things. From checking order statuses to updating customer info, AI Actions let your AI Agent connect to your external systems and take action in real-time. ⚡️
Here’s how to set it up:
You can add AI Actions while setting up your AI Agent:
Inside the AI Actions tab:

4. Choose an Endpoint Method

This tells the AI what kind of operation to perform with your system:
💡 Not sure which one to pick? Start with GET to safely retrieve info before trying other methods.
5. Enter the Endpoint URL
This is the API URL your AI Agent will contact (e.g. https://your-system.com/api/orders)
6 Add parameters and headers if needed
These pass important details like order ID, customer email, etc.
You can define them dynamically — AI Agent will fill in the values during the conversation.
Tip: Only add what’s needed, and make sure to mask or validate any sensitive information.
Not sure where to begin? Here are a few ways teams are already using AI Actions:
Remember: You can define the rules - tell AI Agent when to use an action and how to handle the response. This keeps conversations safe, relevant, and helpful.
Once your AI Action is set up, head to the Playground to see it in action.
The best part? You don’t need to write code - just describe what the AI should do, and let it take care of the rest.
Start today and give your AI Agent the power to not just respond, but take action.
The AI Agent Dashboard is your window into AI Agent activity as you deploy them to assist in handling customer conversations. Currently, you can see up to 30 days of data in the Dashboard for all AI Agents or specific AI Agents.
Please note that only AI Agents published in AutoPilot mode will be tracked in the AI Agent dashboard.

This element shows the total number of conversations containing a message from your AI Agents. This is inclusive of conversations that are escalated to human agents.
This element shows the percentage of conversations that AI Agents have started handling and then passed along to a human agent. The percentage is taken from the total number of AI Agent conversations.
You can see the average number of messages a AI Agent exchanges before escalating the conversation, as well as how long on average the customer spent in conversation with the AI Agent before it reached a point of needing human intervention.
This element shows the percentage of conversations that AI Agents have started and then closed on their own without passing them to a human agent. The percentage is taken from the total number of AI Agent conversations.
You can see the average number of messages a AI Agent exchanges before ultimately closing the conversation, as well as how long on average it took to reach a resolution.
This element shows the percentage of conversations that AI Agents are handling but have not closed yet due to lack of customer response
AI Agent handles 50%+ of your customer conversations, so you always keep support and sales moving! To get the most out of your AI Agent and start saving your team valuable time, check off each of these steps and build the AI digital teammate that suits your customers best.
AI CSAT works as hard as you do, transforming everyday conversations into insights and powerful public reviews. It eliminates the noise and gets straight to the insights that matter. With AI-powered context detection, it knows when not to send a survey, skipping irrelevant or incomplete conversations like greetings or marketing emails.
It automatically tracks sentiment, so when a customer gives feedback, it can instantly convert that into a rating, no extra steps needed. Surveys are fully translated into the customer’s language, using buttons, emojis, or thumbs-up. Say yes to a smoother experience, better feedback, and more reviews, with zero manual effort.
AI CSAT helps you capture the voice of your customers and turn it into both internal insight and external validation. With built-in smart translation across 90+ languages, it ensures your global customers feel heard in their own words.
Whether you’re looking to improve your support quality, identify recurring themes, or build a stronger online reputation. AI CSAT works in the background, quietly powering better experiences and better decisions.
Here’s how AI CSAT helps you stay ahead
Here’s how to set up AI CSAT in your Trengo account in just a few simple steps!
Good to know!
With Trengo AI Journeys, you can now create even better conversations and routing for your customers. Its no-code, no-certification setup allows you to start building your own AI Journeys right away. If you need an estimate of how much average time saved when you use AI Journeys, take a look below:
AI Routing - On average 40 seconds saved
AI Routing identifies and routes the conversation to the right path.
Without AI routing, an agent needs to review each conversation, quickly assess the message, and determine whether they can respond based on their expertise or if it should be assigned to another agent or team. This process applies to reopened conversations, ongoing conversations with a history, and entirely new incoming conversations.
AI Message - On average 20 seconds saved
AI converts your prompts into natural-sounding messages in the most relevant language for the conversation.
Without AI message, an agent needs to draft a response to each incoming message. In some cases. They may also need to translate the message into other languages before crafting and sending an accurate response back.
AI summary - On average 120 seconds saved
AI breaks down your full conversation into a summary.
Without AI summary, an agent needs to reads through all the messages or emails and summarize it based on all the context.
Per AI Agent Message - On average 60 seconds saved per message
AI Agent helps you to answer questions from customers on autopilot based on added knowledge.
Without AI Agent message, an agent needs to identify the question, search relevant documents for the correct information, check potentially the history, and sometimes consult with colleagues to gather additional knowledge. They may also need to translate the message into other languages before crafting and sending an accurate response back.
Per AI Input Collection - On average 15 seconds saved per question
AI input collection gathers information from users through a natural conversation.
Without AI input collection, an agent needs to discover which missing information should be retrieved and should be asked for, or to collect more information to identify the lead. They may also need to translate the message into other languages before crafting and sending an accurate response back.
Condition - On average 15 seconds saved
Conditions are criteria's that needs to match in order to direct the chatter towards the right path in the journey.
Without conditions, an agent needs to check if the conditions from the chat are true or not.
Label - On average 10 seconds saved
Labels help you to categorise and filter conversations.
Without labels, an agent needs to click on the labels, identify and select the label that applies to the conversion between a bigger list of multiple labels.
AI Labeling - On average 30 seconds saved
AI Labeling help you to automatically categorise and filter conversations based on context.
Without AI labeling, an agent needs to click on the labels, identify and select the labels that applies to the conversion between a bigger list of multiple labels.
Assign to team - On average 10 seconds saved
It assigns the conversation to the right team.
Without this, an agent needs to click on teams, identify and select the team that needs to take care of the right team.
Assign to user - On average 10 seconds saved
It assigns the conversation to the right agent (user).
Without this, an agent needs to click on teams, identify and select the team that needs to take care of the right team.
Assign Round Robin - On average 15 seconds saved
Round Robin evenly distributes incoming conversations, to ensure a balanced workload across all team members.
Without Round Robin, an agent needs to monitor every team member's capacity. Checking if they are online/offline at all times and decide to who will be the new owner of handling the incoming conversation.
Close ticket - On average 5 seconds saved
It closes the ticket.
Without having this automated, an agent needs to check if the conversation has been wrapped up and can be closed.
Jump to step - On average 5 seconds saved
This action allows you to jump to a specific step in the journey.
Without it, an agent needs to understand that the incoming question should be forwarded to the right team or agent based of the question or new information which arrived in the conversation.
HTTP Action - On average 2 minutes saved
Use HTTP actions to send data to external services or APIs. The response from the HTTP action can be used in the next steps of the journey.
Without it, an agent needs check the collected data in an external system. Often it is already logged in, uses the search of the right order/booking information and check's the details of the order/booking and based on the gathered information, writes a message back to the customer based of the status.
AI CSAT - On average 20 seconds saved
CSAT allows you to ask how the customer has perceived the help during the conversation.
Without AI CSAT, an agent needs to paste in a pre-defined message into the editor and submits it. After the response got back in, they need to manually store it in a sheet or list to analyse it and keep the overview.
Contact to group - On average 10 seconds saved
Add or remove contacts from designated groups based on specific goals, keeping lists targeted and up-to-date.
Agents need to assess each contact's eligibility before manually adding or removing them from groups.
WhatsApp template - On average 40 seconds saved
Send targeted WhatsApp messages using predefined templates tailored to customer details, ensuring timely and personalised communication.
Agents must search for the appropriate template, add specific customer information, and send it back to the customer. For system-triggered actions (e.g., booking or order confirmations), agents manually locate and personalise the correct template for each interaction.
Wait - no real-time saving
Introduce a controlled delay within the Journey, pausing for a specified time before proceeding to the next step.
Agents naturally experience pauses as they manage multiple customer interactions simultaneously, resulting in “waiting” between tasks.
Media - On average 30 seconds saved
Send media back to the sender in the ticket.
Agents naturally find the correct media on their computer and then selecting or dragging the right media to the conversation.
Log contact moment in CRM - On average 60 seconds saved
Log contact moment in the CRM sytems like Close.io, HubSpot, Pipedrive, Microsoft Dynamics, Salesforce, Zoho and push ticket information and ticket URLs into the CRM system.
Without this action, agents must search themselves in an external CRM system based on names, emails or phone numbers and log the right information afterwards.
Forward to email – On average 20 seconds saved
Forward the conversation to a designated email address, ensuring important information reaches the right inbox directly.
Without this action, an agent needs to forward manually the conversation and type in the receiving emailaddress.
Mark ticket as spam – On average 10 seconds saved
Automatically mark unwanted or irrelevant conversations as spam to keep the inbox clean and focused.
Without this action, an agent needs to manually decide it’s spam and marking the ticket as spam.
Delete ticket – On average 10 seconds saved
Remove irrelevant or duplicate conversations completely from the inbox with one action.
Without this action, an agent needs to manually delete the conversation.
Journeys is Trengo's no-code customer journey builder that creates full-funnel conversation flows in 70+ languages in minutes, so your team can stop wasting time on admin work and start providing personalised, instant support.
Here are some benefits on using Journeys:
Here are the steps to start using Journeys once you have them available in your account:
1. Check out the Trengo left side bar and click the Journeys icon
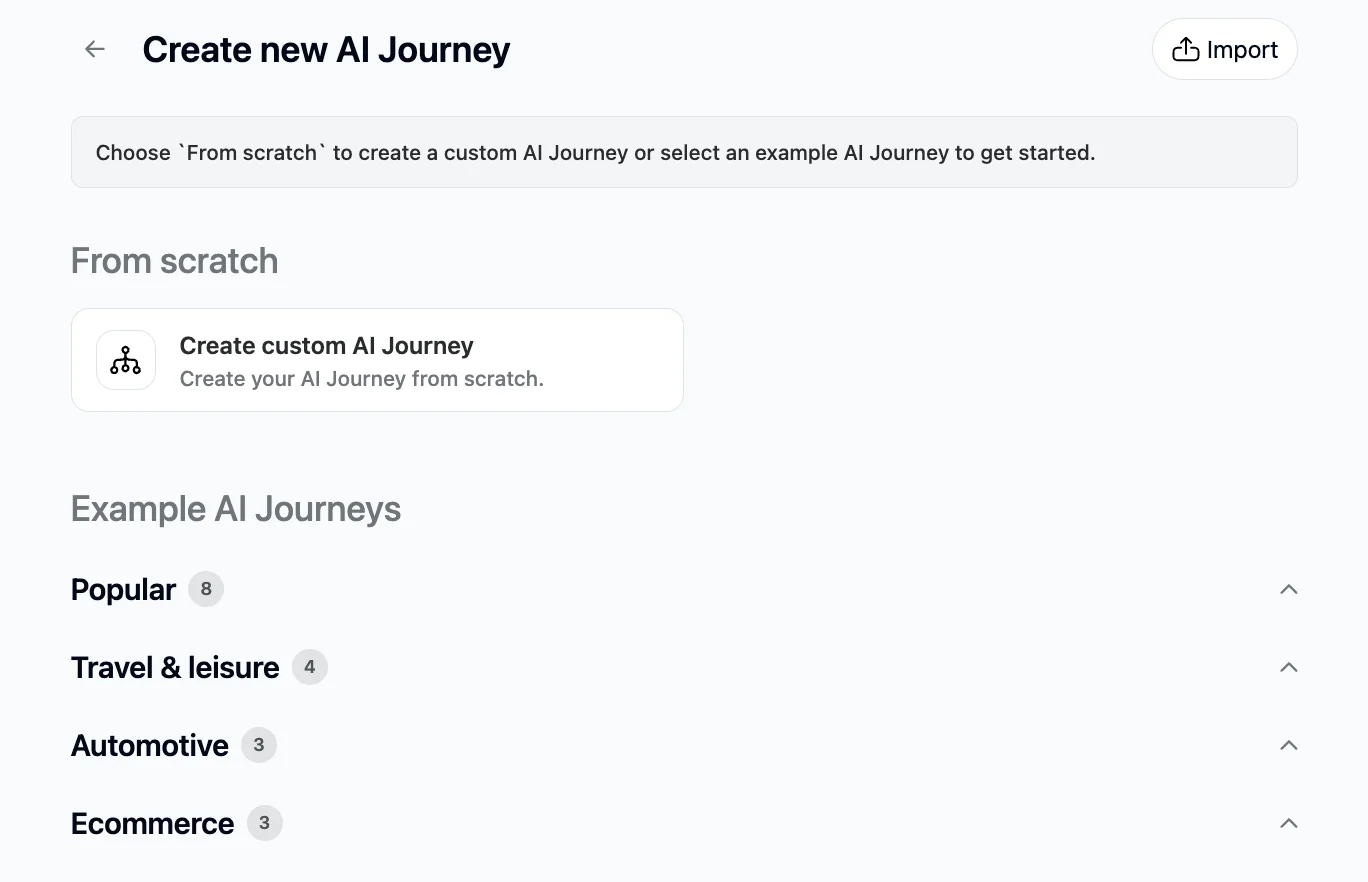
2. You will see this screen as the homepage of the Journeys and you may use some of the sample to start the templates but you can also create from scratch. Click 'Create new AI journey'
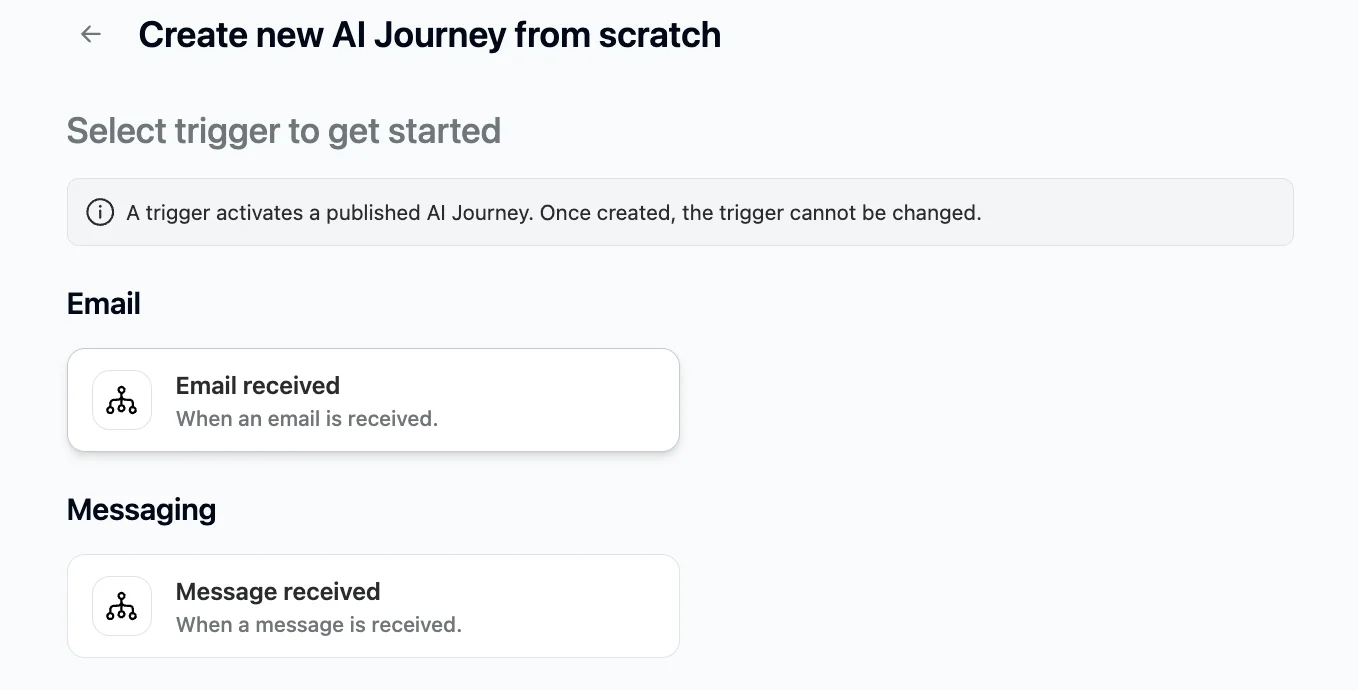
3. Choose the trigger. Note: once it's chosen and a journey is created, you cannot change the trigger anymore.
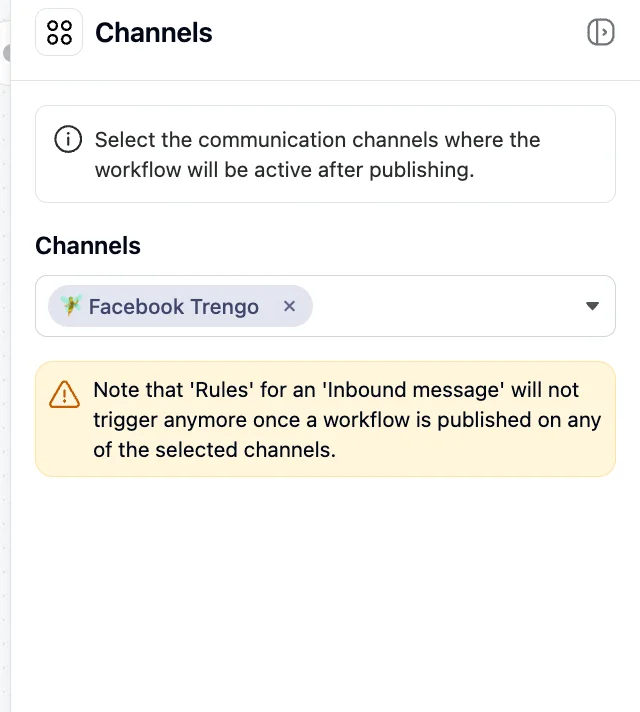
4. Once a trigger is chosen, then you can start creating a journey in the canvas

5. Once you choose 'Select channels', you can now start building the journey
6. Start adding the action as you go along, you can choose the actions provided in the menu:
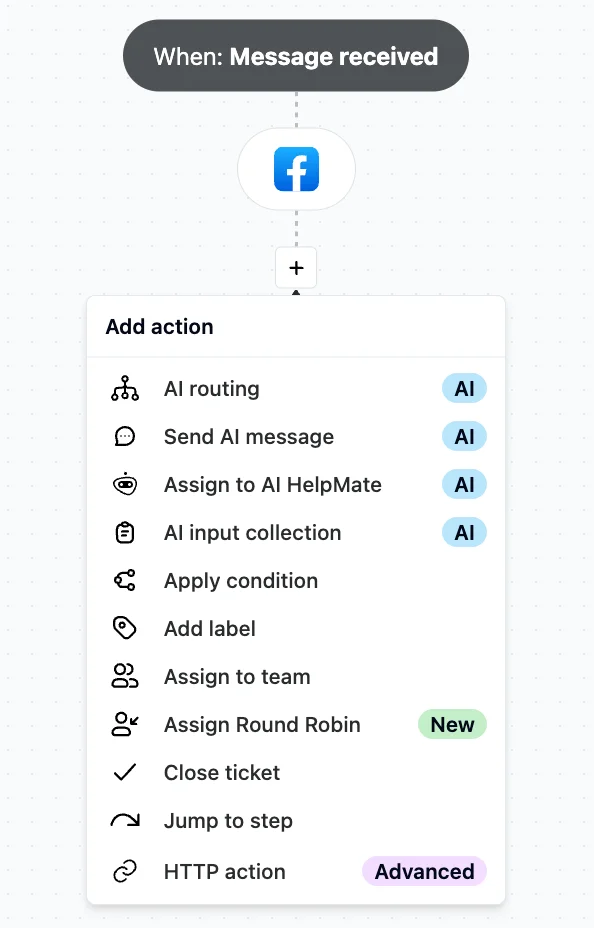
7. Each and every action has a different function. The action is self-explanatory, for example, 'Send AI message', it will mean that we will send a greeting that's AI-powered. Let's use that as an example:
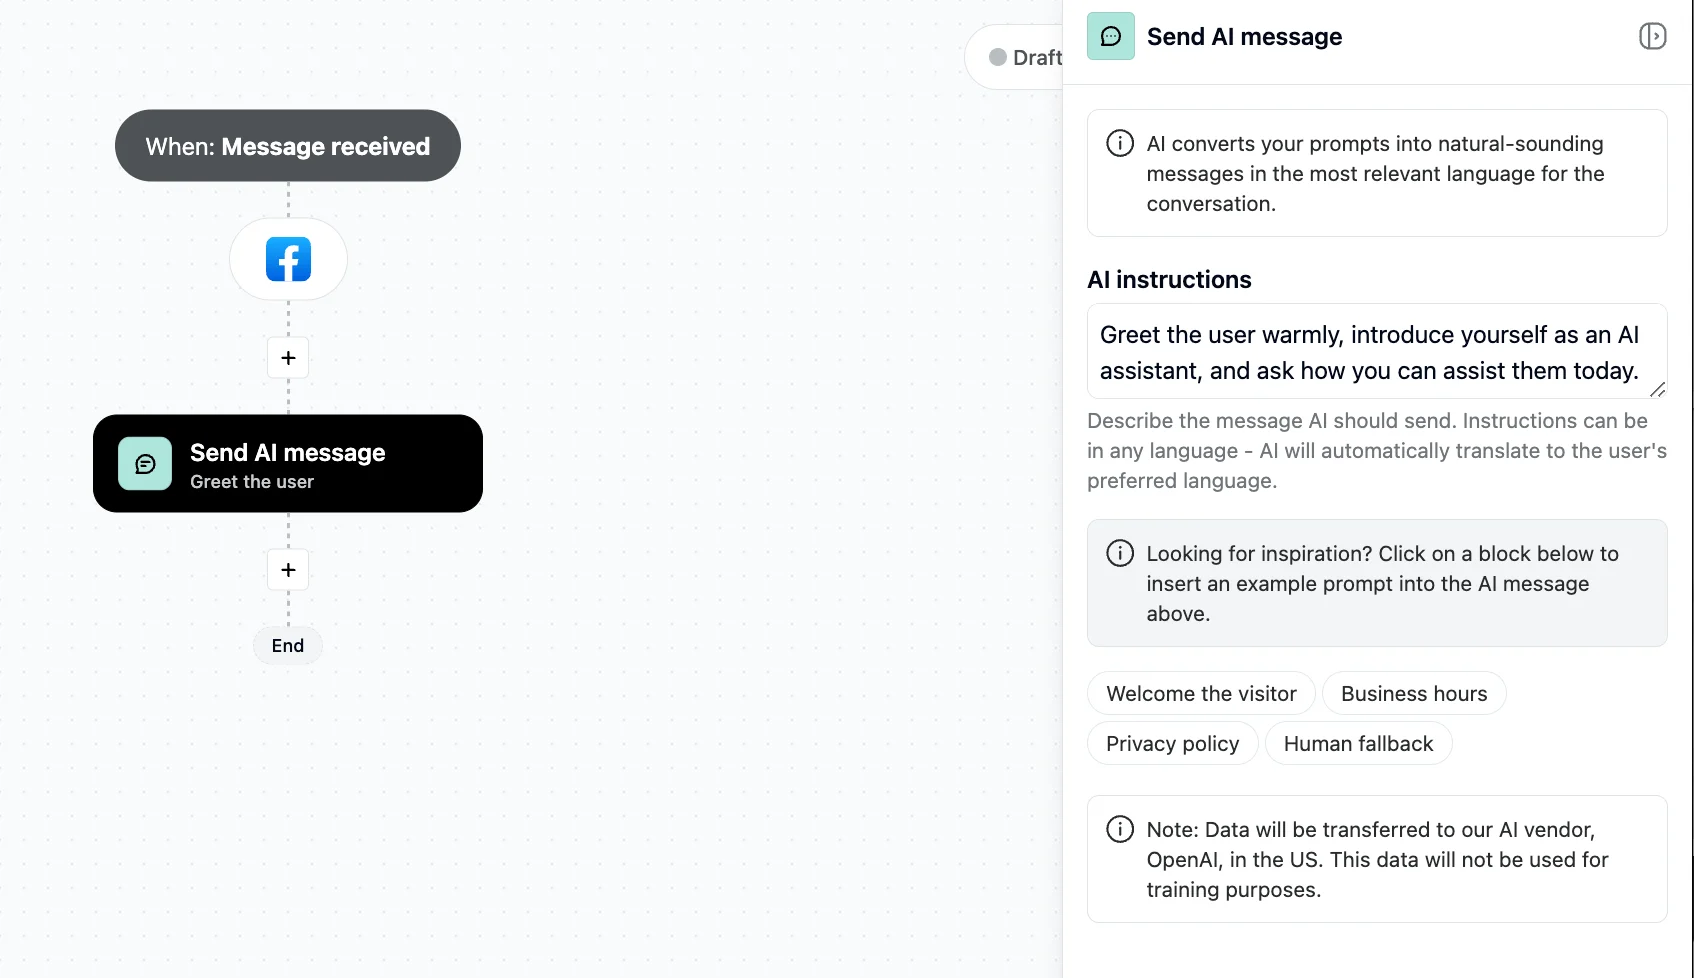
Once you choose the action, it will trigger a dialogue box on the right side of the journeys where you can fill your criterial for this particular AI message. We also have some examples for your inspiration. Once you're good to go with the instruction, don't forget to click 'save.
8. Click the + button to add more action in your journey. In this example, we'll use 'AI input collection' and you fill the right side column as well.
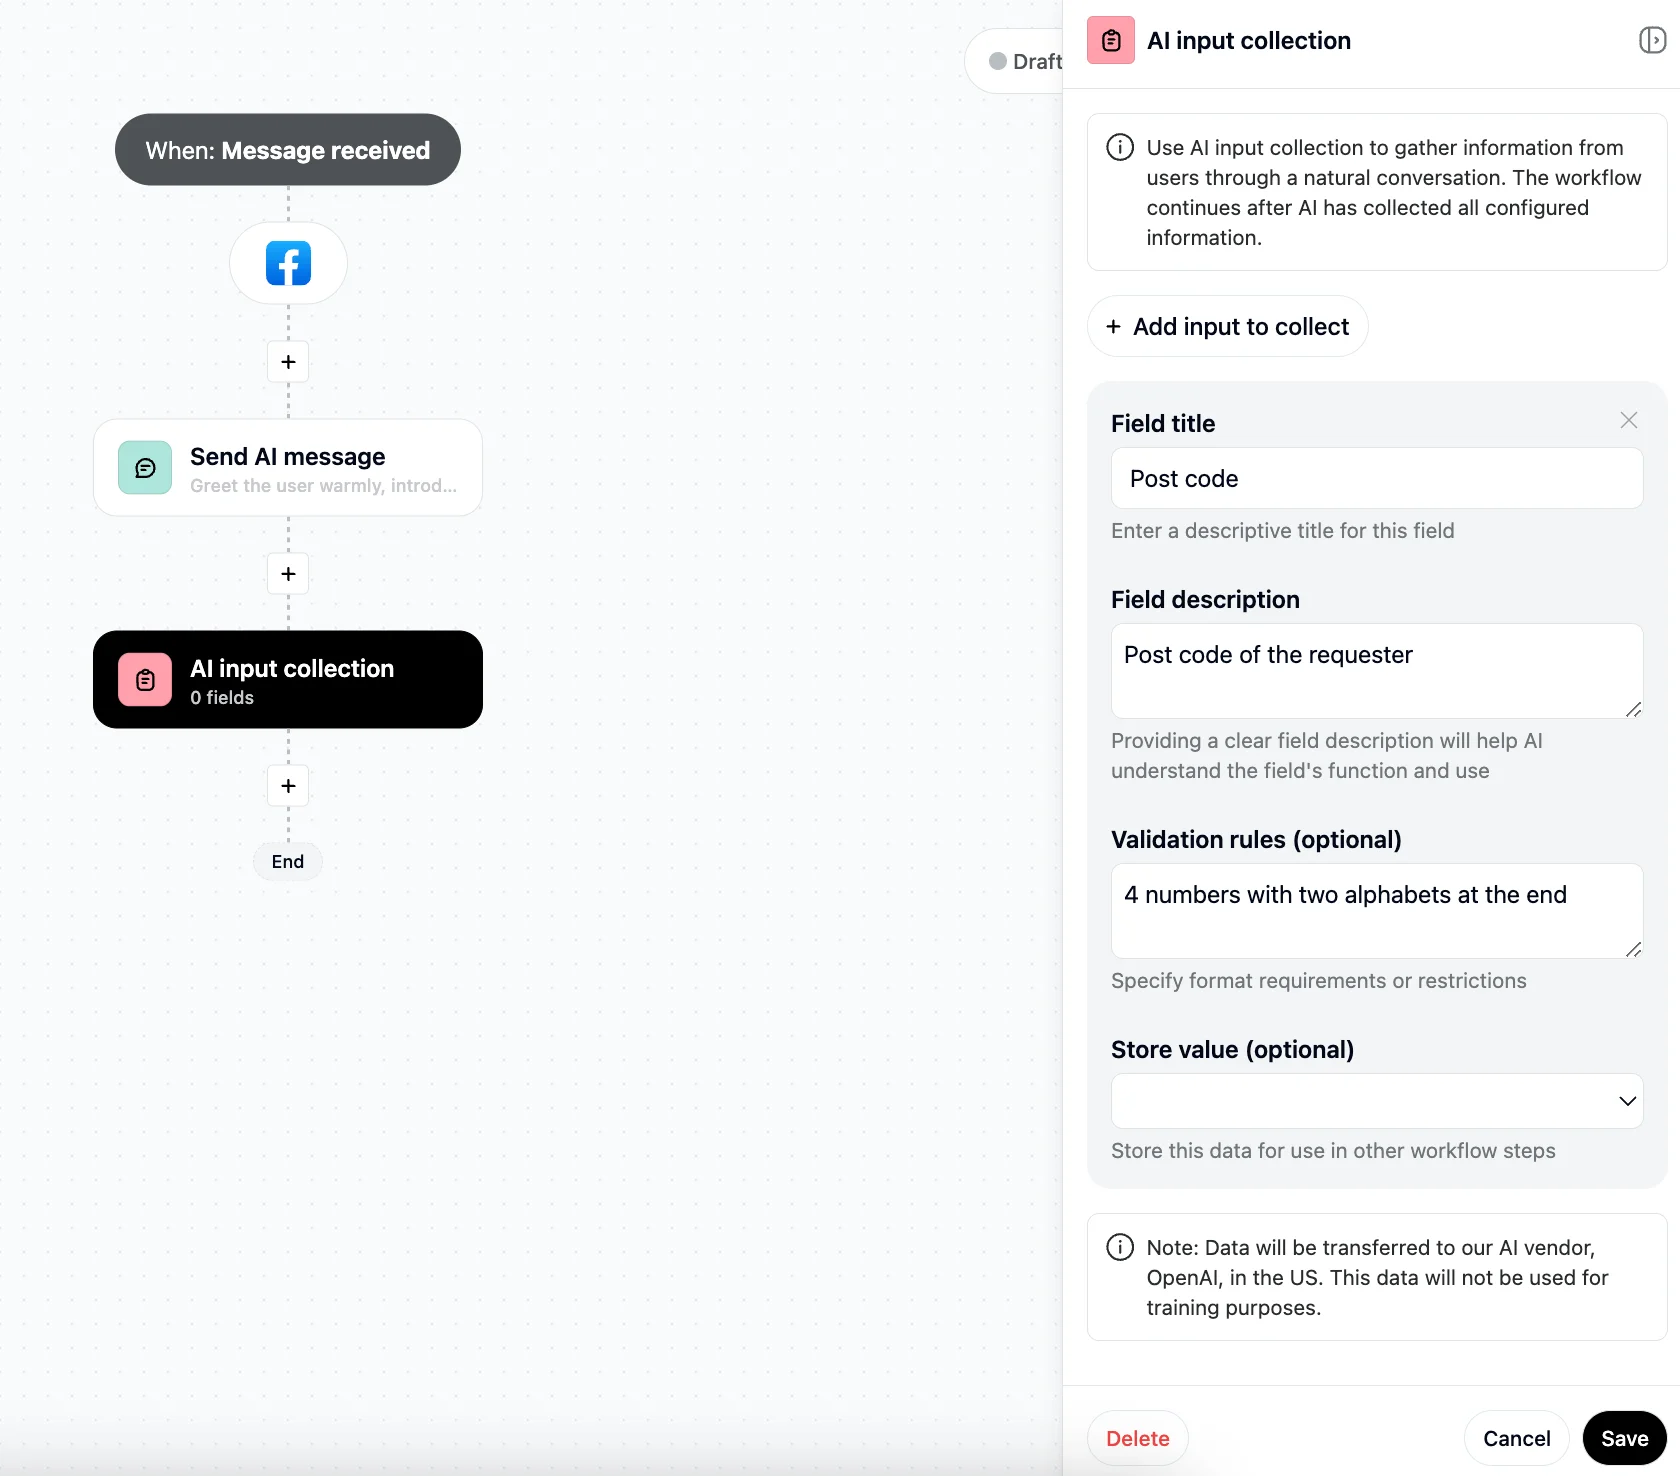
Once you click 'Save', you need to think of the next action. What should happen after the user input the post code? Do you have a specific team to assign or would you ask more question? In this example, after asking the postcode we'll assign it to the team who handles logistics. So, let's add one more action.
9. Click 'Assign to team'. Choose the assigned team on the dialogue box and to end the journey, click Save. You will see the 'End' at the bottom as per the picture below

You can test the journey by clicking the 'Play' button on the top right

Once you clicked them, you will see a dialog box appear on the right side of your screen. In this box, you will be able to test out your own journey before publishing it. It's placed on the side of the journeys so you can easily adjust the action as needed.

Once you're good to go with the playground, you can click 'Publish changes'

There you have it! Your first journey has been created.
If you need a video guidance, you can watch our CPO, Patrick, explained Journeys in details here.
AI Labeling in Journeys is a new feature that automatically categorizes conversations, allowing you to streamline your support process while enhancing lead generation efforts. It provides analytics on the types of products most frequently requested during chats (interested prospects/leads), enabling you to gain a comprehensive analysis. By analyzing closed conversations and tagging them with relevant labels, this helps you organize topics, prioritize responses, and gain valuable insights into recurring issues. With AI Labeling, you can save time, improve efficiency, and make better decisions based on data-driven insights.
How to use AI Labeling
Step 1: Go to Journeys and select the “Conversation closed” trigger:

Step 2: Add a Label Group with the following details:

Group Name: Define the topic or category.

Group Description: Provide the AI model with a short explanation as a prompt about what the labels in this group represent, such as 'Analyze the sentiment' or 'Identify which products or services the chatter is interested in.

Action: Add the labels which are matching the label group.

Step 3: Decide whether only one label from the group can be tagged or if multiple labels from the group can be applied.
Step 4: Save the Journey with AI labeling as action and let the system analyze all closed conversations to identify matching topics.
AI Labeling Dashboard Insights
You can access your AI Labeling data in Journeys side dashboard, which provides an overview of the most frequently analyzed topics. This dashboard makes it easy to spot trends, such as an increase in questions about specific products or recurring issues with services. These insights allow you to take meaningful action, whether it’s improving your support content, adjusting internal processes, or proactively addressing customer pain points.
.webp)

AI Labeling is an essential tool for any team looking to enhance their support and sales operations. By automating the labeling process and delivering clear insights, it helps you stay organized, make informed decisions, and better understand your customers’ needs.
As the landscape of customer support evolves, we are excited to that you’d like to have better conversations with your customers with Trengo AI. This article outlines how we charge our Trengo AI services, particularly AI Agent: Autopilot and Suggested Replies.
Overview of AI Billing
AI Agent's billing consists of two primary components: usage included in your subscription plan and usage that’s billed & charge outside of your plan. Each aspect is designed to provide flexibility and clarity to you as you continue to use Trengo AI. Let’s check out these components.
Trengo offers various plans (Trial, Boost, Pro and Enterprise), each with different limits on the number of included AI Agent Suggested Replies conversations. You can easily track your usage of Suggested Replies conversations on the AI Agent page in your product.
During the trial period, you can access both Suggested Replies and Autopilot. Your trial is limited to 100 conversations, encompassing Playground messages, Autopilot, and Suggested Replies. Once this limit is reached, you must subscribe and choose one of the plans between Boost, Pro or Enterprise to continue using AI Agent.
The Boost plan allows you to leverage both Autopilot and Suggested Replies.
Included Suggested Replies Conversations in the Boost plan:
Playground messages are included. Once the included conversations have been used, charges will apply for additional usage, deducted from the balance. All Autopilot conversations will also incur charges, deducted from the balance.
If you are on the Pro plan, you can also enjoy both Autopilot and Suggested Replies, and you will have more included conversation compared to the Trengo Boost plan.
Included Suggested Replies Conversations in the Pro plan:
As with the other plans, Playground messages remain included. After using the included conversations, additional charges will be deducted from the balance for both Suggested Replies and Autopilot conversations.
Billing for AI Agent involves several key points:
If you are using Autopilot and Suggested Replies, the cost will be deducted from your balance from the start. While Suggested Replies will incur charges once you have exhausted your allotted amount. The surcharge will depend on your subscription plan:
Charges:
You can see the breakdown in the transaction page as ‘AI’ alongside other channels, such as SMS, Whatsapp and Voice. You can refer to the picture below:
.webp)
At Trengo, we strive to offer transparent and flexible billing options that meet the needs of our customers. Understanding these billing structures ensures that users can fully utilise our AI capabilities without any surprises.We encourage to always monitor the balance and top it up when necessary, especially if you’re actively using Trengo AI.
Managing AI surcharges is easy in Trengo. Ensure you have sufficient balance, as it will be deducted for AI usage. You have the option to:
We recommend committing to a balance with a linked payment method to simplify administration and ensure smooth ongoing usage.
A Trengo AI Agent is a digital teammate who can take over customer conversations or suggest answers for your agents. You provide the AI Agent with knowledge resources and assign it behaviours that fall in line with your brand’s tone of voice.
You can locate the AI menu in the black left sidebar. To activate the AI module, follow these steps:

Adding Facebook to your Trengo inbox will allow you to manage all incoming Facebook conversations, mentions, and comments directly in Trengo.
ℹ️ Do note you need to be an admin of that Facebook page you’d like to add.
Follow the steps below to connect your Facebook page to your Trengo inbox.
1. Navigate to Settings > Channels > Facebook and click ‘Connect Facebook;

2. You will be redirected to the Facebook login page. Log in with the Facebook account you have administrator rights to the Facebook page;

3. Select the Facebook page you like to connect to Trengo, and click ‘Next’;

4. Enable all permissions and click ‘Done’;

5. Click ‘OK’;

6. Configure and create your Facebook channel;

1. Internal name: The name of your Facebook channel.
2. Teams: Choose the teams that have access to the channel.
ℹ️ If you want different teams to handle the different types of messages, you can create two separate Facebook channels: one for Private Messages and one for Facebook comments.
3. Connected account: Here you can find the user who connected the Facebook page.
4. Facebook page: Select the Facebook page you connected.
5. Create channel: Click this button when you’re done configuring the channel.
Now you’ve created your channel, you can go ahead and configure the Facebook channel further.
8. Configure your Facebook channel and scroll down to enable or disable different features;

1. Facebook page: The Facebook page connected to this channel.
2. Connection: In case you change your Facebook password, you can reconnect your Facebook page here. This is also recommendable, in case you experience issues with your Facebook channel.
3. Private messages: Enable or disable the option to receive Facebook’s private messages in Trengo.
4. Feed messages: Enable or disable the option to receive comments on your Facebook posts in Trengo.
Do not forget to click ‘Update channel’, and you’ve now connected your Facebook page! It is also possible to connect your Instagram Business account to your Trengo inbox.
\\


