


When you’ve set up your email channel, it’s time to further configure it. We divided the configurable settings into four sections: channel settings, email settings, advanced settings, and domain/Gmail/Outlook settings. In this article, we’ll explain all the things you can configure for your email channel in Trengo.
You'll find these settings by navigating to Settings > Channels > Email > Your email channel.
Configure your email channel
Find all the configurable settings for your email channel below.
Channel settings
Here you’ll find the more general settings, like which teams have access to your email channel.
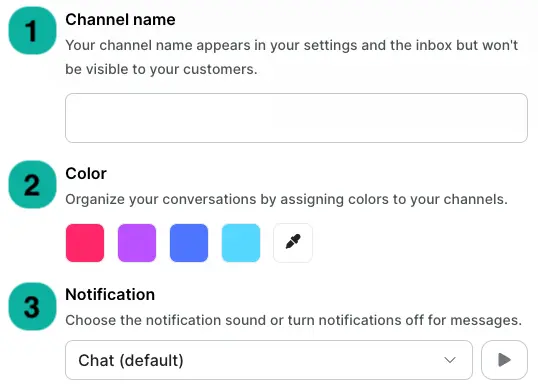
1. Channel name: This is the internal name for your channel, which helps your team to recognize the channel in the inbox.
2. Color: You can give your email channel a color to further distinguish it in the inbox. This color will only highlight the channel's name in the Trengo inbox, and will not be visible outside of Trengo.
3. Notification: The sound you want to hear whenever a new email comes in. If you choose ‘None’ here, there will still be a pop-up with incoming emails, but there will be no sound.

1. Business hours: Add the business hours this channel relates to.
2. Teams: Here you’ll add or remove teams that can have access to this channel.
3. Delete channel: If you wish to remove this channel from Trengo, you can delete it here. Be aware that deleting a channel will also permanently delete all conversations and contacts from this channel.
Email settings
Create a signature and set up your auto replies here.
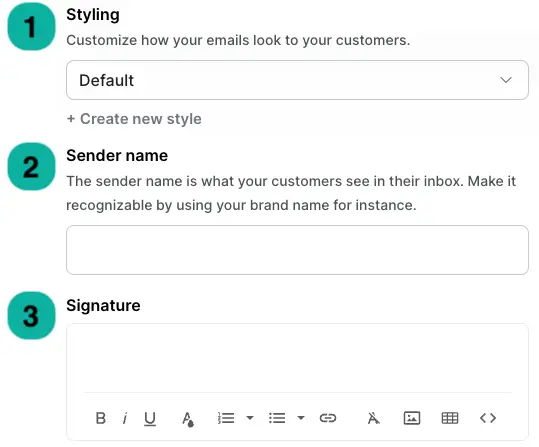
1. Styling: You can choose or create an email theme here. This will help you to align the look of your emails with the branding and image of your organization. You can customize the font family, font color, font size, and line height.
2. Sender name: This will be the name that's visible in your customer's inbox after you or your teammates have sent them an email using this channel.
Please note that some Microsoft Exchange servers might ignore the custom Sender name that you set up in Trengo. If this happens, it means that the Sender will revert to the default one set in your Microsoft account. Make sure to change the Sender name there, and the change will apply to outbound messages sent from Trengo.
3. Signature: You can create your email signature here. Follow the link provided for more information on this topic.
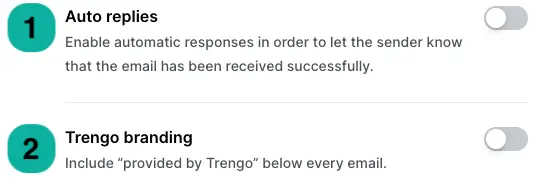
1. Auto replies: Enable this option to set up your auto reply for this email channel.
2. Trengo branding: When enabled, your emails will show “Powered by Trengo” at the bottom.
Note: Trengo branding can be removed on selected plans (Boost and Pro) only.
Advanced settings
You find the more elaborate features to improve your email channel here.
1. Attach full conversation history to reply: This option will include all previous emails in the conversation in the reply to the customer. This could help your team to get a complete picture of a case.

2. Reopen closed conversations: When this feature is enabled, an answer to a closed email ticket, will automatically reopen it.
3. Do not reopen conversations after … days of no message: Here you can enter the number of days after which a ticket, which hasn't received any additional messages, will not be reopened. After this point, a new conversation will be opened instead.

4. Assign reopened conversations to the previous user: This feature will make sure to assign the automatically reopened conversation to the user that has last closed the ticket.
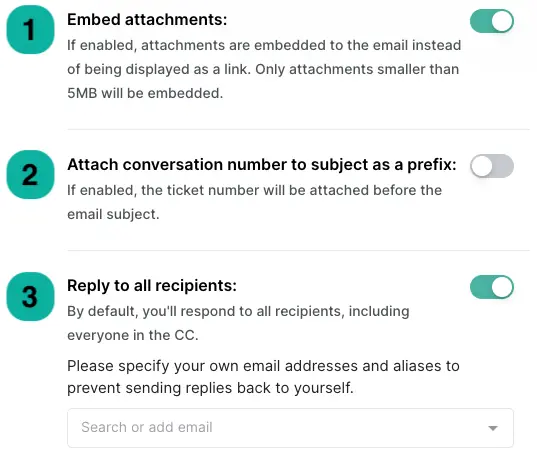
1. Embed attachments: When enabled, any attachments sent in a conversation will be displayed as a link, as long as they are smaller than 5 MB.
2. Attach conversation number to subject as a prefix: Enable this feature to automatically add unique ticket numbers to your emails. Please note, that if the subject line changes from the original - a new thread will start. Changing the subject line always results in the start of a new thread in Trengo.
3. Reply to all recipients: This feature will have you reply to every recipient in an email (including everyone in the CC) by default.
ℹ️ Do not forget to add your own email address to prevent replying to yourself.
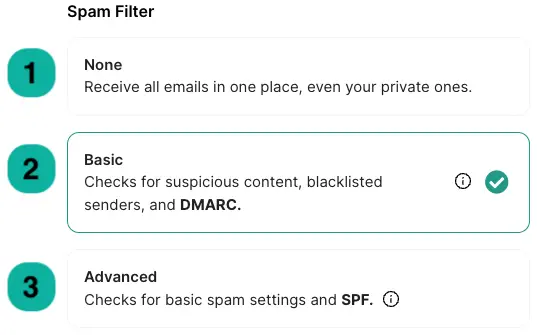
This feature activates a spam filter on all incoming emails. This way, certain emails based on specific criteria are being blacklisted and automatically moved into your spam folder.
1. None: Basic: Default spam protection from your email provider
2. Advanced: Default spam protection from your email provider plus extra blacklist check
ℹ️ All email conversations that have been flagged as spam will be permanently deleted after 14 days.
Additional settings

Synchronise your inbox, bulk import emails, or reconnect your channel.
1. Synchronise conversation status: This feature will show the statuses of the emails (Open, Assigned, and Closed) in your original inbox.
2. Only synchronise selected labels: This option allows you to select which folders you want to synch with Trengo’s Inbox. Please note that if you activate the setting, and don’t select any folder or label - everything will be synched.
3. Bulk import: When clicking ‘Import’, the last 50 emails from your integrated inbox will be imported to this channel.
4. Reconnect: Whenever a disruption between your integrated channel happens, you can Reconnect using the button at the top right.