


Erfahren Sie, wie Sie Ihren KI-Agenten einrichten und konfigurieren, damit er Gespräche führen, Wissen nutzen und Arbeitsabläufe effektiv automatisieren kann.

Wissensquellen vernetzen
Ihr KI-Agent nutzt Wissensquellen, um Kundenfragen zu beantworten. Ohne verbundene Ressourcen kann er keine wissensbasierten Anfragen beantworten.
Wie man es einrichtet

- Zur Konfiguration
- Klicken Sie unter „Ressourcen verbinden“ auf „Ressourcen auswählen“
- Wählen Sie Ihre Informationsquellen
Unterstützte Quellen
- Hilfezentrum / Wissensdatenbank
- Ausschnitte
- Begriff
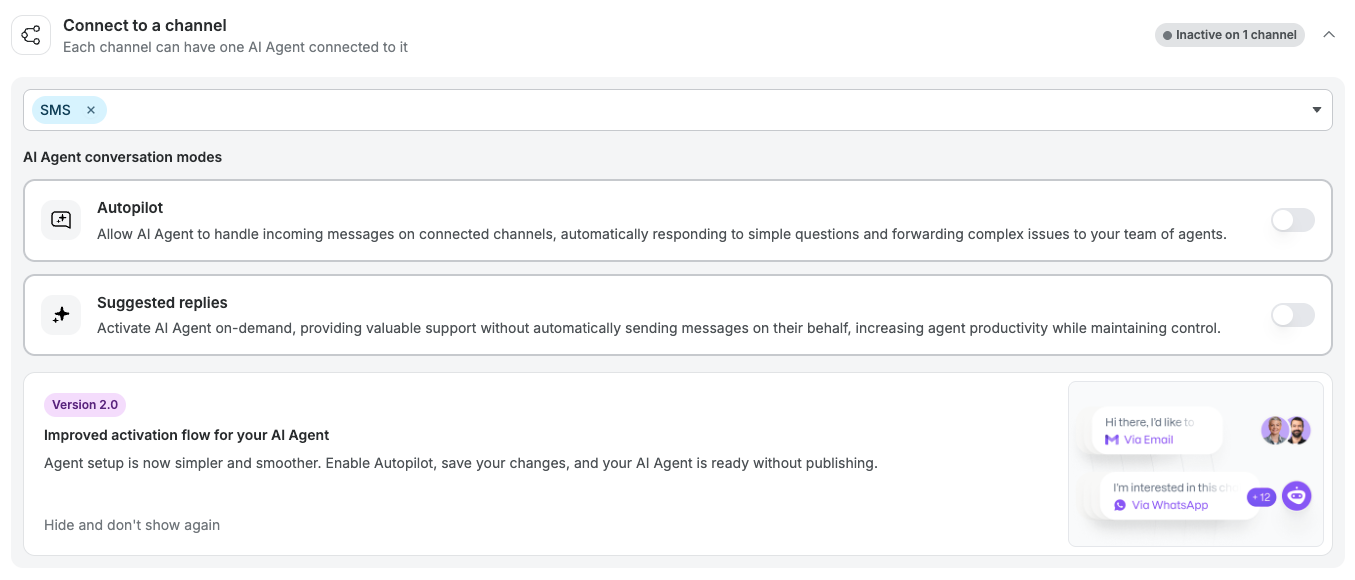
Verbinde den KI-Agenten mit einem Kanal
Sie können Ihren KI-Agenten direkt mit einem Kanal verbinden, um eingehende Unterhaltungen automatisch zu bearbeiten.
Wie man es einrichtet
- Weiter zu „Mit einem Kanal verbinden“
- Klicken Sie auf „Kanal auswählen“
- Wählen Sie einen Kanal aus (z. B. E-Mail, WhatsApp)
Wichtig:
Mit jedem Kanal kann nur ein KI-Agent verbunden sein.
Tipp:
Wenn Sie Journeys verwenden und ein Kanal dort bereits verbunden ist, verbinden Sie denselben Kanal hier nicht erneut. So vermeiden Sie doppelte Verarbeitungen und Konflikte.
Link-Reisen
Mit „Journeys“ können Sie bestimmte Arbeitsabläufe automatisieren und mit Ihrem KI-Agenten verknüpfen.
Wie man es einrichtet
- Zu den verknüpften Reisen
- Klicken Sie auf „Reise erstellen“ oder „Reise verknüpfen“
- Wählen Sie die gewünschte Route aus
Wenn keine Fahrten verknüpft sind, arbeitet Ihr KI-Agent eigenständig.
Standardsprache festlegen
Der KI-Agent erkennt automatisch die Sprache des Kunden. Falls er die Sprache nicht erkennen kann, greift er auf die Standardsprache zurück.
Wie man es einrichtet
- Zur Standardsprache wechseln
- Wählen Sie Ihre bevorzugte Sprache aus (z. B. Englisch)
Zusammenfassung bei Eskalation erstellen
Wenn eine Unterhaltung an einen menschlichen Mitarbeiter weitergeleitet wird, kann der KI-Agent eine Zusammenfassung der Interaktion erstellen.
Wie man es einrichtet
- „Zusammenfassung bei Eskalation erstellen “ aktivieren oder deaktivieren
So kann Ihr Team den Kontext des Gesprächs schnell nachvollziehen.
Inaktive Unterhaltungen automatisch schließen
Sie können Konversationen automatisch schließen, wenn Kunden nicht mehr antworten.
Wie man es einrichtet
- Inaktive Unterhaltungen automatisch schließen
- Legen Sie die Inaktivitätszeit fest (z. B. 1 Stunde)
Hinweis: Die automatische Schließzeit muss länger sein als die Nachlaufzeit.
Erinnerungen senden, wenn keine Antwort erfolgt
Der KI-Agent kann eine Erinnerungsnachricht senden, wenn ein Kunde nicht antwortet.
Wie man es einrichtet
- „Erinnerung senden, wenn keine Antwort erfolgt“ aktivieren
- Legen Sie die Zeitdauer fest, nach der eine Erinnerung versendet wird (z. B. 1 Stunde)
Hinweis: Die Nachverfolgungszeit muss kürzer sein als die automatische Schließzeit.
Aktivierung
Sobald die Konfiguration abgeschlossen ist:
- Autopilot aktivieren
- Klicken Sie auf „Speichern“
Ihr KI-Agent wird automatisch mit der Bearbeitung von Unterhaltungen beginnen.
Integrationen und benutzerdefinierte Aktionen verbinden
Über die Registerkarte „Funktionen“ können Sie Ihren KI-Agenten mit externen Systemen und Datenquellen verbinden. Auf diese können Sie direkt in Ihren Szenario-Anweisungen verweisen.
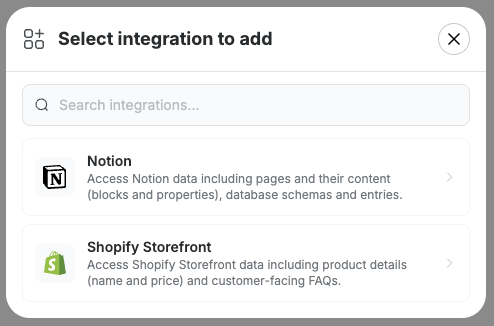
Shopify-Shop
Verbinden Sie Ihren Shopify-Shop, damit der KI-Agent nach Produkten, Preisen und FAQs suchen kann.
So stellen Sie eine Verbindung her
- Wechseln Sie zur Registerkarte „Funktionen“
- Klicken Sie auf „Integrationsaktion hinzufügen“
- Shopify-Storefront auswählen
- Geben Sie im Feld „Shop-Name“ Ihre Shopify-Subdomain ein – nur den Namen, ohne .myshopify.com. Wenn die URL Ihres Shops beispielsweise my-shop.myshopify.com lautet, geben Sie my-shop ein
- Klicken Sie auf „Connect Shop“
Wo Sie Ihren Shop-Namen finden: Melden Sie sich bei Ihrem Shopify-Adminbereich an. Der Teil davor .myshopify.com In der URL steht der Name Ihres Shops.
Anwendung in einem Szenario
„Suchen Sie über die Shopify-Storefront nach dem Produkt, nach dem der Kunde fragt, und geben Sie den Preis in Ihrer Antwort an.“
Begriff
Verbinden Sie Ihren Notion-Arbeitsbereich, um dessen Seiten und Datenbanken als Wissensquelle für Ihren KI-Agenten zu nutzen.
So stellen Sie eine Verbindung her
- Wechseln Sie zur Registerkarte „Funktionen“
- Klicken Sie auf „Integrationsaktion hinzufügen“
- Wähle Notion
- Zugriff auf Ihren Notion-Arbeitsbereich autorisieren
Sobald die Verbindung hergestellt ist, kann der Mitarbeiter bei der Beantwortung von Kundenfragen Inhalte aus Ihren Notion-Seiten abrufen und nutzen.
Anwendung in einem Szenario
„Schau dir die Richtlinien für Gäste in Notion an und füge den entsprechenden Abschnitt in deine Antwort ein.“
Benutzerdefinierte Aktionen
Mit benutzerdefinierten Aktionen können Sie jedes beliebige externe System anbinden, indem Sie einen API-Endpunkt Ihrer Wahl aufrufen. Dies ist nützlich für die Abfrage von Bestellungen, Verfügbarkeitsprüfungen, die Abfrage von Treuepunkteständen oder jedes andere System, das Ihr Team nutzt.
So richten Sie eine benutzerdefinierte Aktion ein
- Wechseln Sie zur Registerkarte „Funktionen“
- Klicken Sie auf „Aktion hinzufügen“
- Nimm folgende Einstellungen vor:
- Aktionsname – Geben Sie ihm einen eindeutigen Namen. So werden Sie ihn in den Szenarioanweisungen bezeichnen.
- Wann und warum diese Aktion verwendet werden sollte – Beschreiben Sie in einfacher Sprache, wann der Agent sie ausführen soll. Seien Sie dabei konkret: Je klarer die Beschreibung ist, desto zuverlässiger wird der Agent sie auslösen.
- Parameter (Erfassen) – Legen Sie fest, welche Informationen der Mitarbeiter vom Kunden einholen muss, bevor er den API-Aufruf durchführt. Fügen Sie für jeden Parameter einen Namen und eine Beschreibung hinzu, damit der Mitarbeiter weiß, welche Informationen er erfragen muss.
- Endpunkt-URL und Methode – Die vollständige API-URL und die HTTP-Methode (GET oder POST). Hierfür benötigen Sie die API-Dokumentation oder den technischen Support.
- Parameter (Senden) – Ordnen Sie die erfassten Parameter genau dem Format zu, das die API erwartet.
- Header – Fügen Sie alle erforderlichen Header hinzu, wie z. B. Autorisierungsschlüssel oder den Inhaltstyp.
- Klicken Sie auf „Aktion hinzufügen“
Anwendung in einem Szenario
„Rufen Sie mithilfe der Aktion „Bestellstatus“ die Bestelldetails des Kunden ab, bevor Sie antworten.“
„Wenn der Kunde nach der Verfügbarkeit fragt, nutzen Sie die Funktion zur Buchungssuche.“
Beispiele für benutzerdefinierte Aktionen
- E-Commerce: Bestellstatus, Rückgaberecht, Treuepunkte
- Gastgewerbe (THL): Verfügbarkeit, Upgrades, Veranstaltungspläne
Benötigen Sie Hilfe?
Klicken Sie im Einrichtungsfenster auf „Benötigen Sie Hilfe bei der Einrichtung?“, um eine Anleitung zu erhalten.